I cannot even begin to tell you how excited I am about this post. Upon hearing about the idea of becoming a part of a blog circle I was immediately intrigued… and what better than to be among an incredibly talented group of women! The theme “Happiness Through My Eyes” formed by Ana is genius as it leaves room for so much creativity and interpretation. So without further ado, I give you my contribution for January. To go to the next blog in the circle by talented Louise Freeland from London, England, click HERE {the link has been updated!}.

Happiness for me, culminates in one specific category: sugar. Long ago I was graced with the nickname “The Sugar Queen” because of my ever-lasting love affair with sweet treats. My husband often goads me and asks me how someone can consume so much sugar on a daily basis. I simply turn to him and laugh as if the question doesn’t even merit an answer. And living on the France/Germany boarder for 2 years has brought one of my old favorites to levels of near obsession: Macarons! I’ve always had a soft spot for these delicate Parisian sandwich cookies, and being so close to the real thing has driven me to become passionate about their creation as well. I’ve made them for parties, for fun, and especially to enjoy a large batch in the comfort of my own home without spending 50€ for 24 macarons {Geez Ladurée… I love you and you’re worth it… but I cannot afford you even on a weekly basis}.
Over Christmas I set out to make cinnamon macarons for my traditional December Christmas cookie swap. I hadn’t made them in about eight months, but I figured it was like riding a bike. Then…I couldn’t find my foolproof recipe. And…it was raining {worst possible weather for trying to make these cookies!}. And then…they cracked in the oven, leaving me without a single macaron that was pretty, pink and perfect. I was horrified, disappointed, frustrated and exasperated and “insert inappropriate expletive here!!!” *sigh* I couldn’t for the life of me figure out what went wrong, so I simply chalked it up to “a bad day to make macarons” and tried to move on let that be my excuse.
One sleepless night shortly thereafter, while my husband lay sound asleep and snoring by my side, I was overwhelmed with curiosity to figure out what had happened to my christmas macaron batch. Really and truly, I just couldn’t let it go that the whole ordeal had been a disaster… and I wanted vindication! So I set out to look up a foolproof recipe. At 3am, deep in a narcoleptic stupor, I stumbled across a blog called “The Brave Tart” written by Stella Parks. The name of the blog had me hooked… the brave tart… I wanted to be a brave tart! Her fantastically comical in your face writing style made me giggle with delight. Her dishes simply screamed “Bake Me! Now!” She was named “one of America’s Best New Pastry Chef’s in February 2012 by Food & Wine Magazine.” She has also made macarons three times a day since 2011. Who better to trust than someone who does it repeatedly EVERY DAY? Surely she knows here stuff. At this point I was game to trust this creative soul in love with chocolate who had spent a considerable amount of time and dedication to to de-mystify the macaron process for over-eager-beavers like me.
I want to give Stella all of the credit for this post. Without her Recipe, Macaron Mythbusters, Macaron Ten Commandments, and All About Hollows, I’d be lost. Hell, so would we all. So please, for the love of macarons, go read “The Brave Tart” Blog links posted above. I do mean READ them. They are a wealth of macaron information {and a joy to read}.


I have found in my macaron journey that reading and researching have been the most helpful way to learn. It’s a common myth that macarons are impossible to make. That’s why I loved Stella. She has done everything to make the process as streamlined and foolproof as possible. She’s also tried the recipe a million ways… when it’s raining… in the humidity of a basement… when she’s listening to Huey Lewis and the News… everything! What she figured out and what I am slowly learning is that there is a method to the madness.
That’s why I love her Macaron 10 Commandments. Because these are the rules you MUST actually follow if you want your macarons to be consistent. After making two batches of Stella’s recipe {one blue and one yellow} I sat down with pen and paper to write notes about specific things I think it’s important to pay attention to. These things are specific to MY house and MY oven… but it’s good to know where you can go wrong.


- Sift Twice! :: It does make a difference! Don’t get lazy on me and only sift the almond flour/sugar combo once. Also, pay attention to the large chunks that won’t go through the sieve…. According to Stella, those can tear straight through your glorious macronage and crack your macarons. When I measure out my almond flour initally, I actually pre-sift exactly 4 oz of almond flour that goes through the sieve. Because I use a scale to measure, the weight is always precisely calculated and I don’t end up with large chunks of almond that don’t fit through the sieve.
- 10 Minute Beating :: When I read Stella’s method of beating the egg whites I was in shock. Beat them for 10 minutes? Seriously?!?!? Yep. Seriously. This girl knows what she’s doing. Just trust and follow her timed instructions. You will end up with the most beautiful dry meringue.
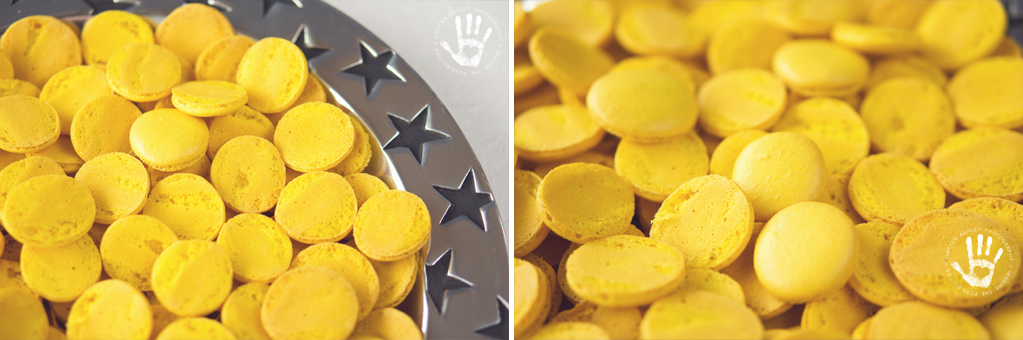
- Macronage :: This step can make or break your macarons. I know, I’ve done it. I don’t say that to scare you… I say it to caution you. This term describes folding the meringue and the sugar/almond flour mixture together. The first batch {blue macarons} I folded 25 strokes + 15 strokes + several {like 8-10} more because I felt it wasn’t incorporated enough. These macarons came out with little or no “feet”* because I had deflated the meringue too much. The second batch {yellow macarons} I folded 25 strokes + 15 strokes + 1 or 2 more. I concentrated on oversmearing when I folded the batter so that by the end of 40 strokes my macaron batter was in a molten lava like state. I want to note that it looked thicker than I thought it should… but I really liked the way this batter piped and the second batch had really good “feet”. {*Feet: the term used for the frilly bottom of a macaron}
- Scrape It Down! :: I remembered reading about this in the Macaron 10 Commandments… and it’s seriously true. Scrape the bowl down as often as possible so that everything mixes evenly. If you have a rogue unmixed ribbon of meringue it can cause all of your macarons to crack. In the first batch {blue macarons} I had several macarons crack in a row. Needless to say, the yellow macarons turned out much better.
- Whack That Sheet :: This part isn’t a joke either. Make SURE you whack your baking sheet against a table-like surface to get the air bubbles out of your piped macarons. I even go back through with a straight pin and make sure all of the bubbles at the surface that haven’t broken are popped. This can also make your macarons crack as the air rises to the surface during baking.
- No Drying Time?!?!? :: Yep. You read right. This is why Stella is my hero. The step of drying your macarons for 30 minutes to an hour always cheesed me off. I don’t have enough patience to allow the glossy caps to mattify. With Stella’s recipe you can pipe your macarons and then pop those suckers right into the oven! They still yield glorious feet! I was in awe. **Note: Stella mentions in Macaron Mythbusters that “if your macarons are slightly overmixed, about 15 minutes of drying will give them a better foot.” So in my first batch because I had overmixed the batter I should have let it sit for 15 minutes and the macarons would have yielded a better “foot.”
- °F vs °C :: I don’t know about you but when I have to convert °F to °C my brain glitches. I immediately cringe because I worry that my oven temp, which I set by hand not digitally, is going to be off. Since 300°F = 148.889°C I have reason to be cautious. Stella suggests buying an oven thermometer to make sure your oven is actually set at 300°F. I’m tempted to do so… but for the time being I use trial and error and a knife to dig a groove into my dial at the exact perfect temp {don’t you dare judge!}.
- Where’s Your Rack? :: I complete agree with Stella that knowing your oven is a very important commandment {See Macaron 10 Commandments}. In my first batch {blue ones!} I tested the oven rack in three different places to try to find the perfect location. My oven has four oven rack slots. The first go round I had the cookie sheet in the second to bottom rack: the back row of Macarons cracked beyond repair. Next, I placed the baking sheet on the very bottom row: ALL of the macarons cracked. Out of sheer desperation, I moved to the shelf second from the top: it worked like a charm. All but one of my macarons were perfect! So pay attention to where you oven fan blows and your rack location. It sure makes a difference!
- Cool ’em Upside-down :: I read Stella’s “All About Hollows” blog post discussing the in’s and out’s of why macarons turn out hollow. She recommends several options, one of which was cooling them upside-down. The science is similar to the way you cool an angelfood or chiffon cake upside-down on top of a wine bottle. The sheer weight of the macaron tops will cause the insides to fall giving you a hollow macaron. If you dry them upsidedown however, the inside cools but doesn’t deflate. Genius huh? Let me tell you… it works like a charm! So when you take your macarons out of the oven, simply flip the parchment paper over {your macarons shouldn’t release from the parchment until they’ve cooled} and cool them upside-down.
- Just Wait :: Apparently macarons are supposed to “cure” for 24 hours in an airtight container before they are “ready.” I thought this was ridiculous {I know, I lack serious patience} until I tried it simply by accident. I couldn’t eat all of the macarons I made in one day so I stored them for the next day… I was amazed at how much better they taste on day 2, 3, 4…. etc. So my solution is this: the day you bake your macarons, eat some! They’ll still be delicious…. but know that the next day you’re in for a real treat because they’ll taste even better!

Here is Stella’s recipe from “The Brave Tart”. I want to make it clear that this is her EXACT recipe. I take no credit for the recipe itself. I did photograph my experience as I walked through her recipe to help you understand that it is possible for an average non-pastry chef to make beautiful macarons with her recipe! Any additional comments from me are highlighted in blue.
French Macarons – by Stella Parks aka “The Brave Tart” {with photographs by Kirsten Ashley Photography}
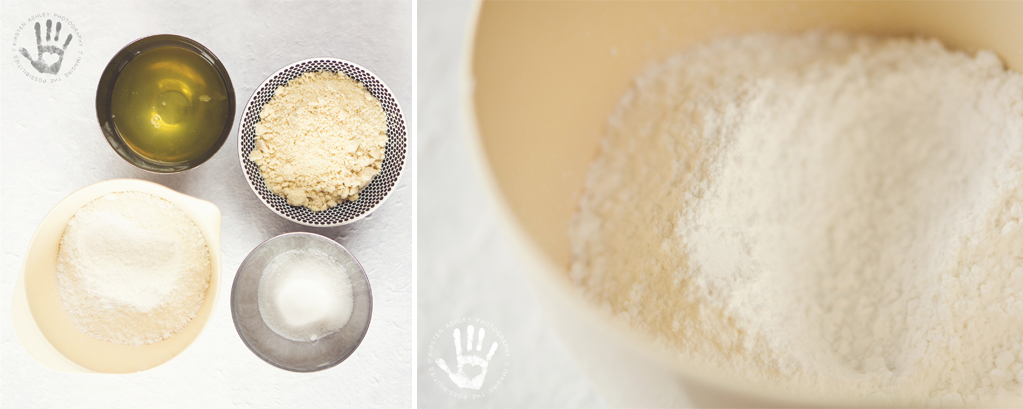
4 ounces (115g) blanched almonds or almond flour, or whatever nut you like
8 ounces (230g) powdered sugar*
5 ounces egg whites (144g), temperature and age not important!
2 1/2 ounce (72g) sugar
the scrapings of 1 vanilla bean or 2 tsp vanilla extract {I omitted the flavoring so the filling flavor would shine!}
1/2 tsp (2g) kosher salt
Preheat the oven to 300° and have ready a large (18”) pastry bag, fitted with a plain tip. If you haven’t wrangled a pastry bag into submission before (or if you have and found it frustrating), these 12 tips for using a pastry bag will make the process mess and stress free; take the time to read them before you get started and you’ll do great!
You’ll also need two parchment lined sheet pans ready too.
I am hopelessly impatient and given to rushing, even when I know better. So to prevent my macarons from growing ever larger as I pipe, I use a 1 1/2” cookie cutter to trace out guide-circles (about an inch apart) and then I flip the parchment paper over, ink side down. {This is a great idea, but even this perfectionist skipped this step}
If you use almond flour, you lucky dog, simply sift it with the powdered sugar and set aside. If a significant portion won’t go through your sifter, however, you’ll need to grind them up until they do.
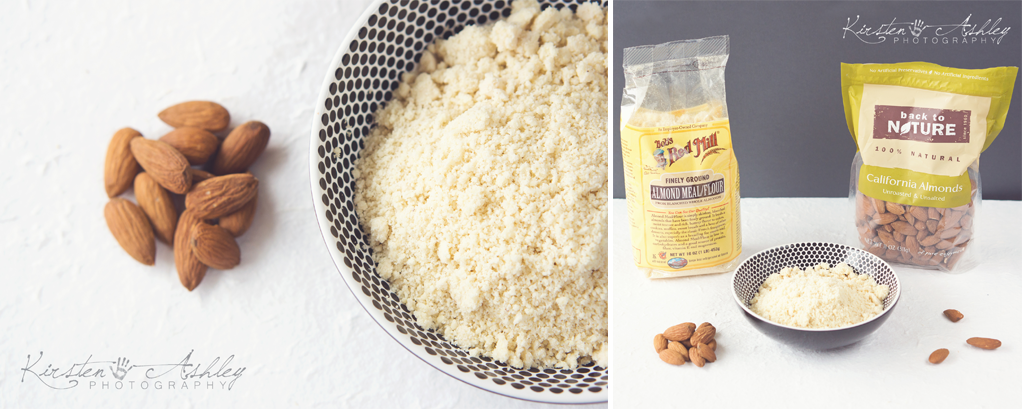
{I used Red Mill pre-ground almond flour. So I’m a lucky dog. However, I was able to find whole almonds at the commissary if you want to try your hand at making your own almond flour.}
In that case, or if you’re using whole nuts, bust out your food processor. Process the almonds and powdered sugar for about a minute. Take out the mixture and sift it, reserving whatever bits don’t pass through the sieve. Add these bits back to the food processor and run the machine for another minute. Sift again. You should have about 2 Tbsp of slightly chunkier almond bits, but hakuna matata. Just add those into the dry mix.
In the bowl of a stand mixer, combine the egg whites, sugar, vanilla bean (not the extract), and salt and turn the mixer to medium (4 on a Kitchen Aid). Whip for 3 minutes. They will not seem especially foamy at that point.
Increase the speed to medium-high (7 on a Kitchen Aid) and whip another 3 minutes, then crank the speed to 8 for go another 3 minutes.
At that point, turn the mixer off and add in any extracts/flavor/color and whip for a final minute on the highest speed, just to show it who’s boss (and to evenly distribute the color/flavor). I highly recommend not adding any flavor or color if it’s your first time, or if you’re wanting to learn about macarons. Additives make learning trickier. If you’re not here to learn, just to eat, then carry on!
At the end of this minute, you should have a very stiff, dry meringue. When you remove the whisk attachment, there will be a big clump of meringue in the center, just knock the whisk against the bowl to free it. If the meringue has not become stiff enough to clump inside the whisk, continue beating for another minute, or until it does so.
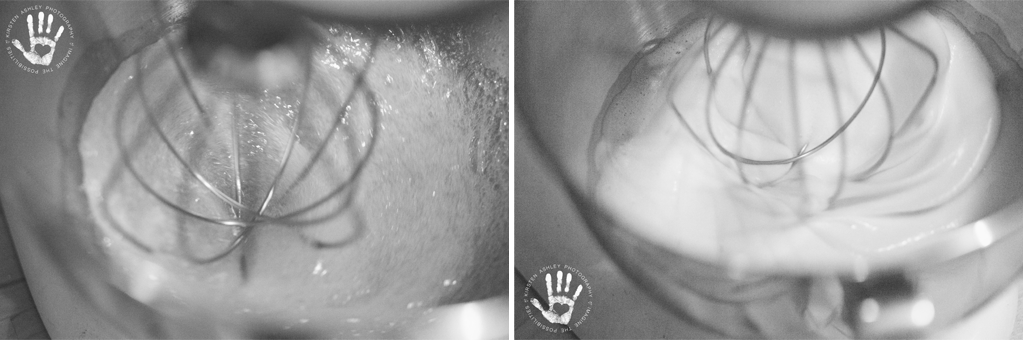
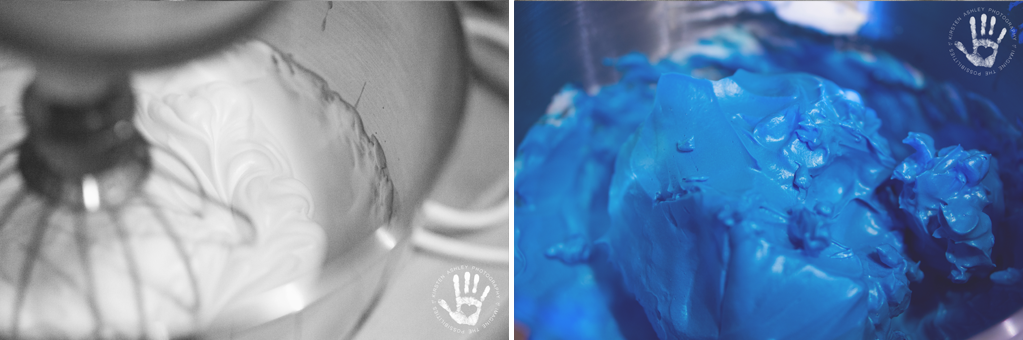
{Top left: egg white / sugar mixture at 3 minutes beating at speed 4. Top right: egg white / sugar mixture at the end of the next 3 minutes beating at speed 6. Bottom left: egg white / sugar mixture at the end of the next 3 minutes beating at speed 8. Bottom right: egg white / sugar mixture at the end of the final minute beating at speed 10. The large ball in the center is what came out of my beater.}
Now dump in the dry ingredients all at once and fold them in with a rubber spatula. Use both a folding motion (to incorporate the dry ingredients) and a rubbing/smearing motion, to deflate the meringue against the side of the bowl.
First timers: the dry ingredients/meringue will look hopelessly incompatible at first. After about 25 turns (or folds or however you want to call “a single stroke of mixing”) the mixture will still have a quite lumpy and stiff texture. Another 15 strokes will see you to “just about right.” Keep in mind that macaronage is about deflating the whites, so don’t feel like you have to treat them oh-so-carefully. You want to knock the air out of them.
Undermixed macaron batter: quite stiff. If you spoon some out and drop it back into the mix, it will just sit there and never incorporate. Do this test before bagging your batter and save yourself the trouble of baking of undermixed macarons!
Overmixed macaron batter: has a runny, pancake batter-like texture. It will ooze continuously, making it impossible to pipe into pretty circles. Um, try not to reach that point.
You can evaluate your batter one stroke at a time, no rush.
Essentially, the macaron batter needs enough thickness that it will mound up on itself, but enough fluidity that after 20 seconds, it will melt back down. I’ve heard people describe this consistency as lava-like, or molten, and that’s pretty apt.
Transfer about half the batter to a piping bag. (When your bag is too full, the pressure causes the batter to rush out in a way that’s difficult to control, making for sloppy macarons.)
Pipe the batter into the pre-traced circles on the baking sheet. Stop piping just shy of the borders of the circle, as the batter will continue to spread just a bit.
After piping your macarons, take hold of the sheet pan and hit it hard against your counter. Rotate the pan ninety degrees and rap two more times. This will dislodge any large air bubbles that might cause your macarons to crack

{Photograph taken after 1st batch is piped and smacked so air bubbles are dislodged}
Bake for about 18 minutes, or until you can cleanly peel the parchment paper away from a macaron. If, when you try to pick up a macaron, the top comes off in your hand, it’s not done.
Once the macarons have baked, cool thoroughly on the pans, before peeling the cooled macarons from the parchment. Use a metal spatula if necessary.
{Second batch of macaron caps cooled! I was amazed at how easily these released from the parchment paper. You can tell by the undersides that they are not hollow!}
Fill a pastry bag fitted with the buttercream {you can use buttercream, jam, lemon curd, etc! – kw} of your choice and pipe a quarter sized mound of buttercream into half of the shells, then sandwich them with their naked halves.
Macarons, against all pastry traditions, actually get better with age. The shells soften and become more chewy, mingling with the flavor of the buttercream too. So, while of course you can eat them right away, don’t hesitate to store them refrigerated for up to a week. If at all possible, set them out at room temperature for a few hours before consuming, because cold buttercream is kinda gross.
*Cornstarch-laced powdered sugar isn’t a problem for macaron making, but it is a problem for Passover. You can buy cornstarch free powdered sugar here.
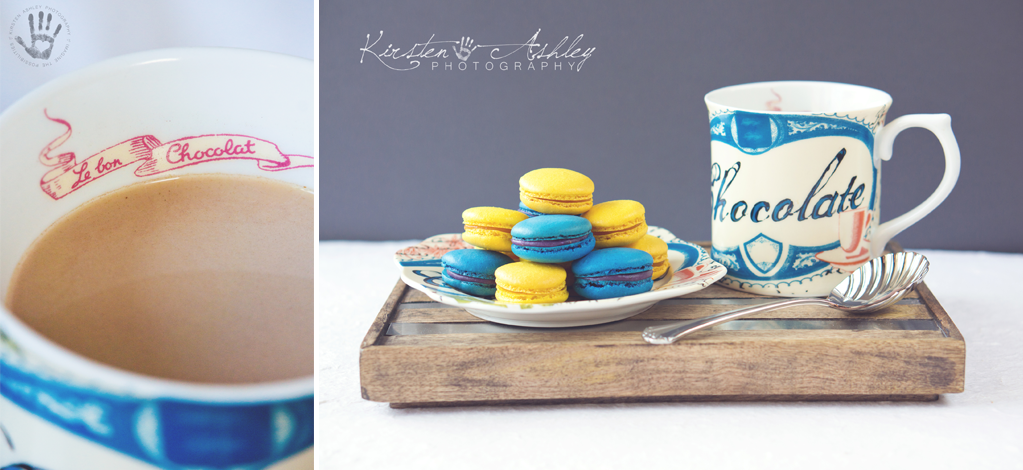
Once the shells were finished, I filled the blue macarons with a blueberry white chocolate ganache and the yellow ones with a deliciously tart lemon curd. After I made both batches of macarons, the food photographer inside of me begged for a foodie photo shoot. I wish you all the best of luck in making these macarons! Remember, the more times you make them, the more you’ll understand the ingredients and your oven. Keep at it and never give up!


Thanks for joining me through this macaron adventure. If you are interested in a personal lesson in making these delightful treats, please email me at kirstenashleyphotography@gmail.com and I’d be happy to set up a cooking day!
To continue to the next link in the “Happiness Through My Eyes” blog circle, head on over to Louise Freeland Photography as she writes about happiness through her eyes in London, England click -> HERE!
Wishing everyone a most marvelous Friday!!
**Watercolor Macaron credit to Lucileskitchen.

![]()
![]()
![]()
![]()
![]()
![]()
![]()